Shine some light on your broken tail-light

We’ve all had those days when the last thing we need is something breaking, especially an essential part of your car! You need not worry, we’ve found some great tips and tricks to help you decide how to fix that pesky broken tail-light. If you plan on doing it yourself, we’ve got you covered.


DIY

Estimated Time: 15-20 minutes

  • First you are going to need a list of appropriate tools: sockets, wrenches, a screwdriver, a ratchet wrench, and potentially other elements, depending on your vehicle’s condition, make, model, etc. Also gloves can come in handy.
  • Go into the cargo/trunk space and remove the cover over the tail-light and turn signal. Once that cover is removed you can then safely and carefully remove the bulb. Be cautious of broken glass and be careful that the bulb is not too hot to touch.
  •  You can remove the cover by either twisting it off or using a wrench or screwdriver.
  • After replacing the new tail-light test it to see if it works.
  • Refer to your car’s handbook for any needed instructions

You can find used tail-lights at R.H. Willson-Used Auto Parts, where our employees will be more than willing to lend a helping hand.

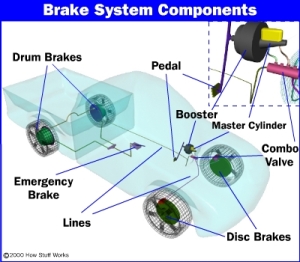
Escape the Stress of Brake Failures

One of the most important components of a vehicle (at least in my opinion) is the brakes. Sure a car radio seems vital on your commute to work, but your brakes are the only thing standing in between you colliding with that giant truck in front of you. It’s a vital part of your car and just like the rest of your car it needs maintenance  Just the thought of a brake failure causes immense anxiety but with the right knowledge any one can avoid it. Just by keeping an ear out (literally) for automotive disrepair can help avoid some of the cringe-worthy damage that can be caused to both your car and your wallet. We’ve all heard that tell tale squeak of brakes being applied and that can be indicator number one to a worn out brake-pad. Every-time we step on the brakes, pressure is applied to the brake-pad, resulting in wear and tear to the brake-pads.

We found this great Graphic via How Stuff Works!

We found this great Graphic via How Stuff Works!

To ensure safety to both you and fellow drivers out there, head to your local Auto Repair shop and have your brakes checked out. Signs of an impending brake failure are; your car begins to glide to a stop and a squealing noise when pressure is applied to the brakes. You can avoid sky-high costs by going to the your local auto repair shop as soon as you see these signs. By using  used auto parts you can also cut costs without cutting quality. Keeping these tips in mind will not only make you knowledgeable but also might prevent you from being in an undesirable situation!